Part 1: Bootstrap vCenter Server Appliance 6.5 on vSAN 6.6:

I have recently installed vSphere 6.5 and vSAN 6.6 in our lab, I have got 4 vSAN Hybrid ready nodes ,  which I will use to setup a vSAN cluster.

Most interesting thing with the 6.5 vSphere release apart from the HTML client and other enhancements  is the ability to bootstrap VCSA on a target host by creating a vSAN datastore. With earlier version we used to deploy the VCSA on a temporary data store and later storage vMotioed to the vSAN datastore.

“Jase McCarty” has written a cool blog on the same, you can refer to the below link for details:

Bootstrap the VCSA onto vSAN 6.6

However, I will try to cover the deployment in more details including all the screenshot which can help people deploying vSAN 6.6 for the first time. So let’s get started.

I have installed ESXi 6. 5 on all 4 nodes. It’s time to install the vCenter to configure the vSAN Cluster.

Mount the VCSA installer and run the installer.exe file:1

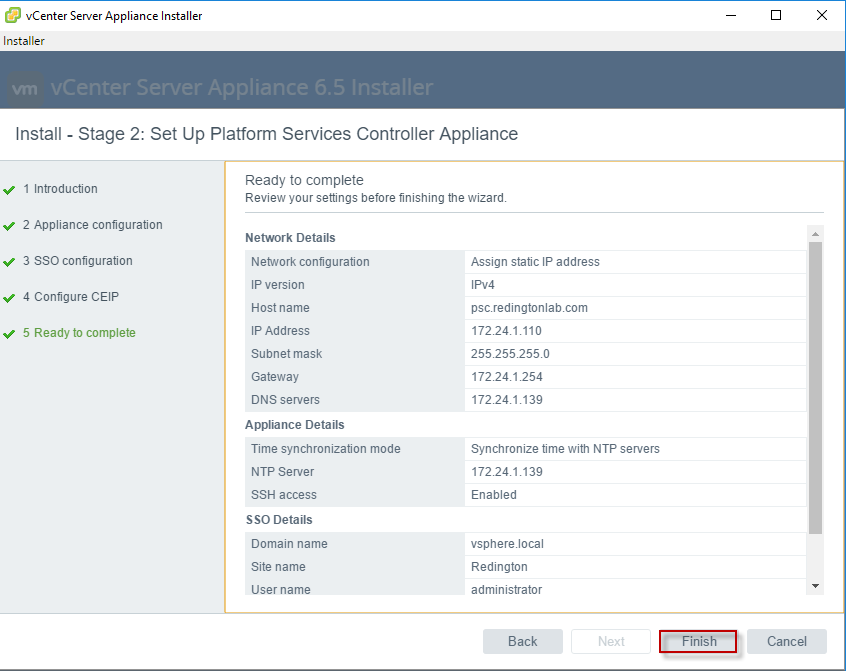
Wizard is similar to previous VCSA 6.x install until we reach the “Install – Stage 1: Deploy PSC” page:11.png

1

I am deploying the External PSC appliance, however the process is similar for Embedded PSC as well.1

The Screenshot is self-explanatory, I am deploying the vCenter appliance on ESXi host “172.24.1.101” .

1

Select yes for the certificate warning.

1.png

1

This is where we will be creating a vSAN datastore locally on the host and install VCSA. Note that during bootstrapping, you don’t need to have vSAN Network configured on all the nodes. At this moment vSAN Datastore is local to the host, I will cover in another blog post how to expand the vSAN Datastore by claiming the disk from other nodes in the cluster.

1


1.png

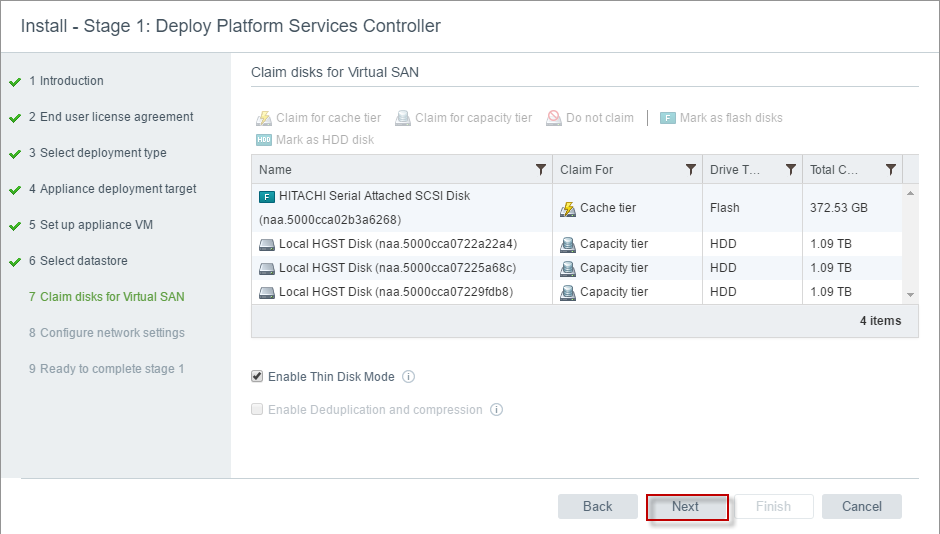
Provided you are using a vSAN compatible controller and Drives, ESXi will detect the flash and HDD resources in the server. In case ESXi is not detecting Flash or HDD, you can manually tag local storage resources as SSD or HDD in this step. For checking the vSAN compatibility, refer to the link below:

VMware Compatibility Guide


1.png

Enter the required networking details for the PSC, make sure to configure the DNS host name resolution (forward and reverse) of PSC before deployment .

1.png

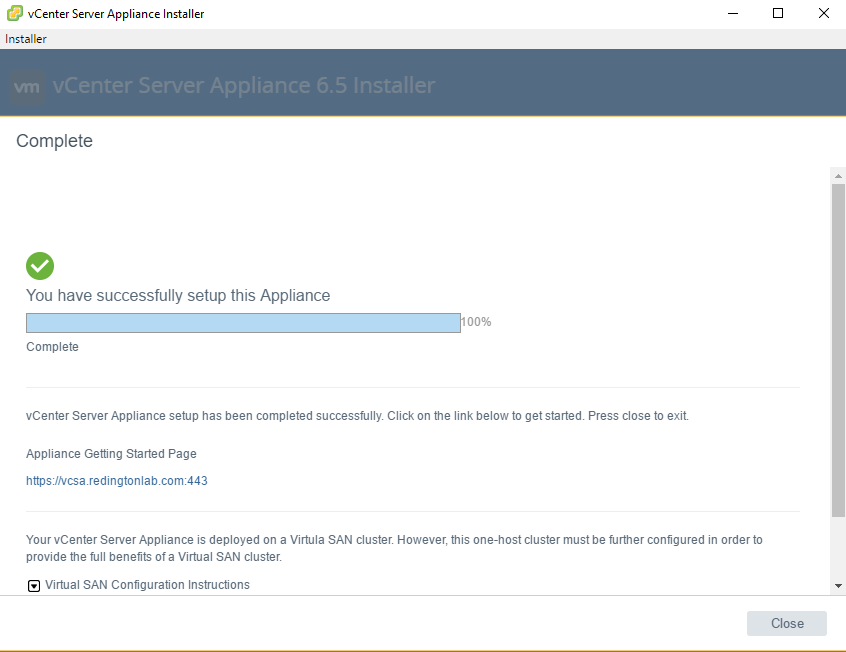
Finish and wait, the deployment took less than 5 minutes

1

1.png

1.png

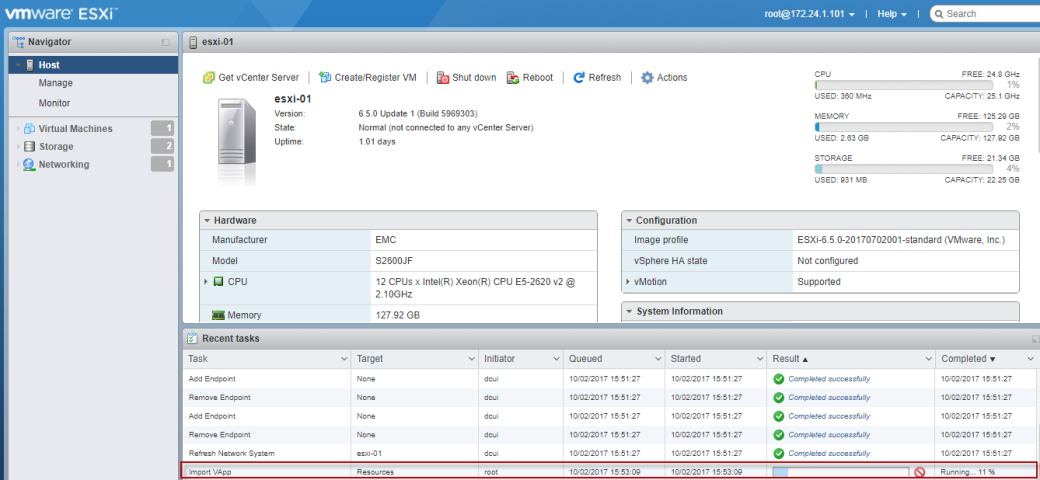
Looking at the host client, I can now see a new “vSAN datastore” and PSC getting deployed on newly created vSAN Datastore.

1

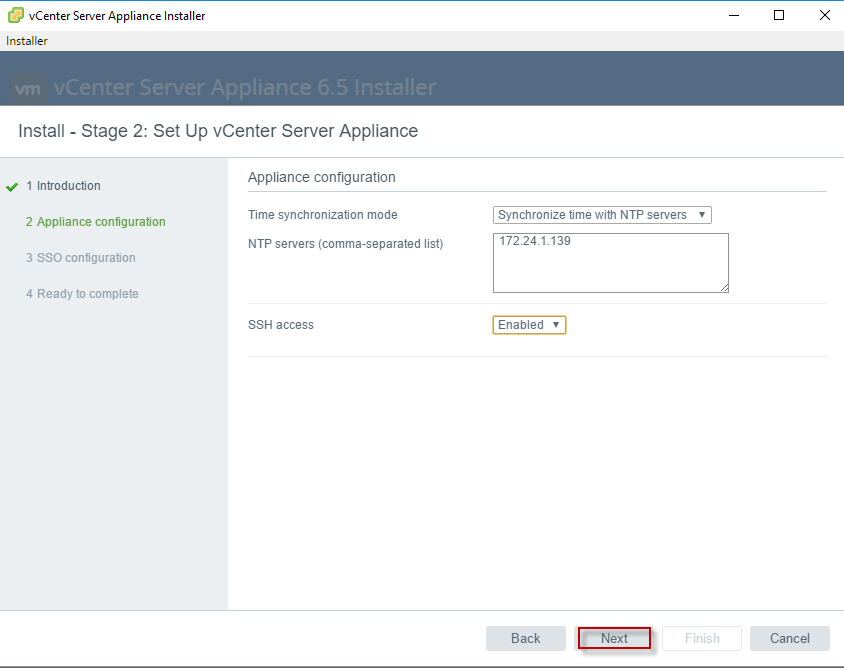
Once done, we need to configure the appliance size and SSO in stage 2, refer to the below screenshots:

1

1

1.png

Here you can either join the PSC to an existing SSO (if exists) to run a linked mode configuration or if it is a new deployment select the “create new SSO domain”.

1.png

1.png

That’s it for PSC deployment, now we need to run the same installer, this time we will install the vCenter server.

1.png

1.png

1

1

1.png

Select the vSAN datastore created during the PSC installation.

1.png

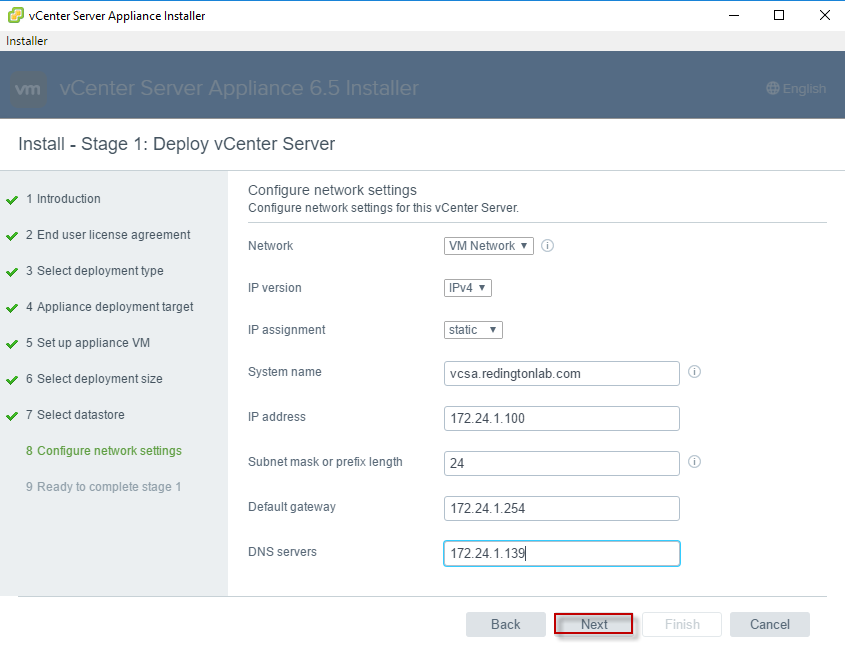
Enter the network configuration for the vCenter server:

1.png

1.png

1.png

Finish and wait, you can actually see the VCSA deployment progress by login in to the target host.

1.png

1.png

1.png

1.png

1.png

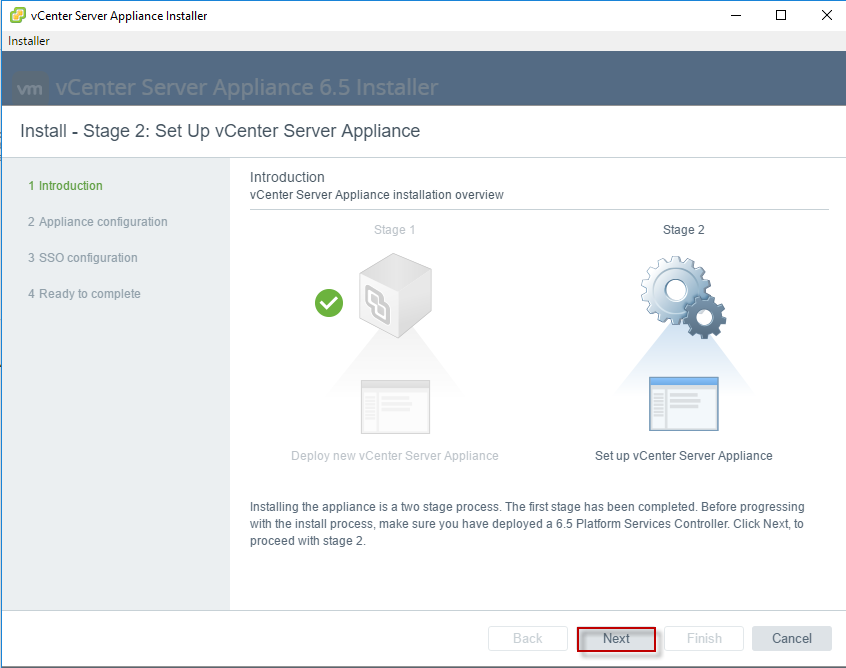
With this now we need to configure the SSO for the vCenter server to complete the deployment.

1

1.png

That’s it for this post , I have covered the expansion of vSAN datastore by claiming storage resources from rest of the hosts in below post :

Expending vSAN 6.6 Datastore after initial VCSA bootstrap

ESXi Certificates in vSphere 6

Starting from vSphere 6.0, VMCA (VMware Certificate Authority) provisions each new ESXi host with certificates when they are added to the vCenter Server system.1.png

In contrast to vCenter Server Certificates, ESXi certificates are not stored in VECS (VMware Endpoint Certificate Store). Instead they are stored locally on each host in /etc/vmware/ssl


An upgrade to ESXi 6.0 replaces existing thumbprint certificates with VMCA signed certificates, custom certificates are retained. However if you select renew certificates in vSphere web client, VMCA pushes a fresh VMCA signed certificate to the host and overwrites any existing certificate even a custom certificate.2.png

To prevent overwriting custom certificate, you can change the certificate mode from vSphere Web Client. There can be three kind of certificate mode in vSphere 6.0:

  • Thumbprint mode: To accommodate any legacy host
  • VMCA Mode: Which uses VMCA as a root CA
  • Custom Mode: To use only third party certificate


To set certificate mode in vSphere web client, go to vCenter Server – Manage – Settings – Advance Settings – click edit3.png

In the filter box, enter “certm” to display only certificate management keys.4.png


Change the value of “vpxd.certmgmtmode” to custom, if you intend to manage you own certificate and thumbprint if you want to use thumbprint mode and click OK.

Restart the vCenter server service. The mode always apply to all the host managed by vCenter server system that uses that mode.

Port Mirroring in vSphere Distributed Switch(VDS)

In this blog, I will shows how to configure and use the Port Mirroring functionality in the vSphere Distributed Switch.

Port mirroring is the capability on a network switch to send a copy of network packets seen on a switch port to a network-monitoring device connected to another switch port. Port mirroring is also referred to as Switch Port Analyzer (SPAN) on Cisco switches. In VMware vSphere, a Distributed Switch provides a similar port mirroring capability that is available on a physical network switch. After a port mirror session is configured with a destination—a virtual machine, a vmknic or an uplink port—the Distributed Switch copies packets to the destination.

In this blog I will use Linux01 VM to capture and monitor mirrored traffic of Linux02 VM.

  1. In the vSphere web client , go to VM and Templates in the inventory tree and open the console of Linux01 machine which I will configure to capture the traffic from Linux02 VM1
  2. Monitor the command output for a few seconds and verify that ICMP traffic is not being captured. tcpdump output remains silent until ICMP traffic is detected on the network
  3. Leave the console window open, with the tcpdump command running uninterrupted
  4. In vSphere Web Client under VM and Templates, Right-click the Linux02 virtual machine and select Power > Power On.
  5. After the Linux02 virtual machine starts, sign on as root. The Linux02 virtual machine is used as the traffic source to be monitored.
  6. At the Linux02 command prompt, ping the default router. In my case my router in on 172.20.10.102
  7. Go back to Linux01 VM again and click the Linux01 console tab.
  8. In the console window, verify that the running tcpdump command is the same as before and has not captured any ICMP traffic

Now i will configure the Distributed Switch for port mirroring

  • In the Web Client on the left pane, click the Networking icon.
  • In the Networking inventory tree, select the dvs-Lab distributed switch.
  • In the middle pane, click the Manage tab and click the Settings tab.
  • Click the Port mirroring link.
  • In the Port mirroring panel, click the New link.

3

  • In the Add Port Mirroring Session dialog box, leave the Distributed Port Mirroring     radio button selected and click Next.4
  • Under Edit properties, select Enabled from the Status drop-down menu.
  • From the Normal I/O on destination ports drop-down menu, select Allowed.
  • Click Next5
  • Under Select sources, click the Select distributed ports icon.6
  • In the Select Ports dialog box, select the check box for the row with a connected entity of Linux02 and click OK.7.png
  • click Next8
  • Under Select destinations, click the Select distributed ports icon.9
  • In the Select Ports dialog box, select the check box for the row with a connected entity of Linux01 and click OK.10
  • Click Next11.png
  • Under Ready to complete, review settings and click Finish.12
  • In the Firefox window, click theLinux02 console tab.
  • Verify that the ping command is still reaching the default router at 172.20.10.10.
  • In the Linux01 console, examine the tcpdump output in the terminal window.
  • The output looks similar to the following example13.png
  • You can see Now that the Linux01 (destination) has started mirroring the ICMP pings from Linux02 VM (Source).

Host & storage advance performance charts in vSphere Web Client

In this blog post I will talk about some of the advance storage and host performance charts that we can create in vSphere web client to review performance statistics of vSphere environment.

I will start with the basic storage and performance graph available in vSphere Web Client and later we will look into some advance options which help us in understanding the current performance statistics of vSphere environment.

 Storage overview charts:

(i) Log in to vSphere web client with the SSO administrator credential

(ii) In the left pane, click the Storage icon.

1

(iii)Expand the Storage inventory tree and select the Shared datastore you want to analyze.

(iv) In the middle pane, click the Monitor tab and click the Performance tab

(v) Above the charts, verify that Space is selected from the View drop-down menu.

(vi)Review the overview charts to find the performance values.

(vii) Space that is used by virtual disks, in the By File Type chart2.png

(viii) Total space that is used by the top objects, in the By Virtual Machines (Top 5) chart

3.png


ESXi Host overview charts:

(i) In the left pane, click the Hosts and Clusters icon.

4

(ii) In the Hosts and Clusters inventory tree, select the host you want to analyze, in my  case it is esxi01.vclass.local.

(iii) In the center pane, click the Monitor tab and click the Performance tab.

(iv) Above the charts, verify that Home is selected from the View drop-down menu.

(v) The time of any significant CPU spike, in the CPU (%) chart5

(vi) The time of any significant latency spike, in the Disk (ms) chart

6.png


Now I will show how to configure advance custom charts in vSphere Web Client:

(i) In the chart links panel, click the Advanced link.

(ii) Collapse the links panel by clicking the << icon.

(iii) The viewable chart area can be increased by collapsing the chart links panel.

(iv) Above the chart graphic, select Memory from the View drop-down menu.

(v) The View drop-down menu appears above the top-right corner of the graphical chart, to the right of the chart title.

(vi) To the left of the View drop-down menu, click the Chart Options link and customize the chart options.

7.png(vii) In the Chart Metrics panel on the left side of the window, verify that only Memory is selected.

(viii) Select Real-time from the Timespan drop-down menu.

(ix) Select Stacked Graph per VM from the Chart Type drop-down menu.

(x) In the Select object for this chart panel, click all to select all the listed objects.

(xi) In the Select counters for this chart panel, click none to deselect all counters and select the Usage check box.

(xii) Click OK to close the Chart Options window.

8.png

The customized chart displays the memory usage counter for all virtual machines that are in a running state, as well as for the ESXi host.

9.png(i) Examine the performance chart legend.

(ii)Scroll down to uncover the performance chart legend.

(iii)The Average column is the last column in the table and might not appear until more space is made available by resizing columns.

(iv)Point to the average column values to determine the average memory usage for esxi01.vclass.local and the Linux01 virtual machine.

(v)Export an advanced chart as a graphic image.

(vi)Scroll to the top of the chart pane.

(vii)Click the Export icon and select To PNG.

10

The exported image looks like below:

11.png

Like this we can create custom advance charts for CPU and storage parameters as well.

I am planning to write a blog post on resxtop commands in future which can be used to capture performance data via command line.

i hope you liked the post , any feedback’s from the readers regarding the content are welcomed.  keep learning and sharing.


Working with vSphere Management assistant

Before I talk about the various commands we can use with VMA , first let me explain bit about VMA.”vSphere Management Assistant enables administrators to run scripts or agent that interact with ESXi host and VMware vCenter server systems without authenticating each time. VSphere Management Assistant is easy to download and install, and configure through vSphere Web Client.

vSphere Management assistant is a virtual appliance that consist of following components:

– SUSE Linux Enterprise Server

– vmware tools

– vSphere SDK for Pearl

– vSPhere CLI

– Java JRE Version 1.6

– vi-fastpass , an authentication component for the appliance

vSphere Management Assistant requires ESXi Host that supports 64-bit virtual machines. The CPU on the ESXi host must be AMD opetron , rev E or later, or an Intel processor with EM64T support with VT enabled.by default vSphere Management Assistant uses 1 vCPU , 600 MB RAM and 3 GB of virtual disk. VSphere Management Assistant is used with vSphere 5.x or 6.

Let’s get started now.

  • Start SSH and vSphere ESXi Shell Services on the ESXi host you want to manage from vSphere Management assistant
  • Login to VMware vSphere Management Assistant, You use PuTTY to establish an SSH session to the VMware vSphere Management Assistant appliance.
  • using vi-admin as the user name and password that you have set during the initial power on the appliance1.png
  • Now we need to add vCenter Server systems and ESXi hosts as vSphere Management Assistant target servers to simplify commands
  • Add the vCenter Server system as a server target.
  • vifp addserver vc01.vclass.local –authpolicy fpauth –username administrator@vsphere.local
  • Any user with sufficient vCenter Server privileges can be specified, including VMware vCente  Single Sign-On users. The vSphere administrator user name is used here because it is the default vCenter Server Appliance administrator account.
  • When prompted for a password, enter the password you have set
  • When prompted to store the user name and password in the credential store, enter yes.2
  • Add the ESXi host as a server target.
  • vifp addserver esxi01.vclass.local –authpolicy fpauth –username root
  • When prompted for a password, enter password yo have set3
  • List the configured target servers.
  • vifp listservers
  • vCenter Server system and the ESXi host appear in the list.vc01.vclass.local   and esxi01.vclass.local must be listed4
  • Now I will add ESXi host thumbprint to the certificate store on the vCenter Server system so that a trust relationship exists between the host and the server. This trust relationship is necessary to run ESXCLI commands.
  • Let me show what happens when I run the command without adding ESXi host thumbprint to the certificate store on the vCenter Server system5
  • Add the ESXi host thumbprint to the vCenter Server certificate store.
  • /usr/lib/vmware-vcli/apps/general/credstore_admin.pl add -s esxi01.vclass.local -t thumbprint
  • thumbprint is displayed in the last command. You can copy the thumbprint into the command by selecting and right-clicking it.6
  • Now you can use ESXCLI commands to query the ESXi host properties , I will show you some important command that you can use in day to day administration of vSphere environment
  • Set the ESXi host as the current target server.
  • vifptarget -s esxi01.vclass.local
  • As a result of running the command, the name of the target server appears as part of the command prompt.8
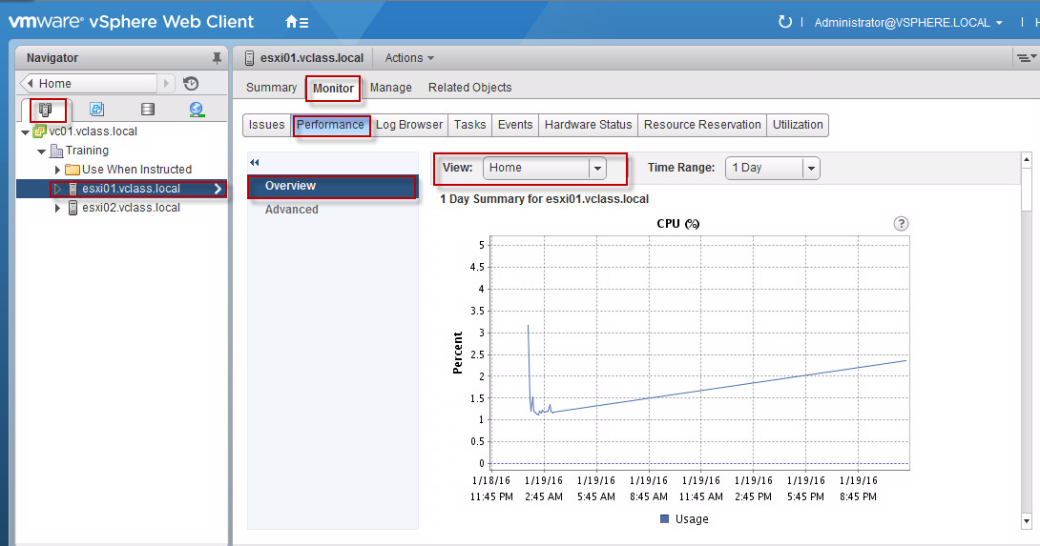
1.Display the CPU characteristics of the ESXi host.
  • esxcli hardware cpu list9
  • Use the command output to determine CPU characteristics.
  • Number of CPUs installed on the host
  • Brand of the first CPU
  • Family and model of the first CPU
  •  Core speed of the second CPU
  • 2.Display the ESXi host memory.
  • – esxcli hardware memory get10
  • Use the command output to determine memory characteristics.
  • Amount of physical memory
  • NUMA node count
  • 3.Display the platform on which the ESXi software is installed.
  • esxcli hardware platform get11
  • Use the command output to determine platform characteristics.
  • Product name
  • IPMI supported status
  • 4.List the software version of ESXi that is installed on the host.
  • esxcli system version get125.Display the time and date on the host.
  • esxcli hardware clock get

    6.Determine the system host name.

  • esxcli system hostname get

    7.Determine the system’s boot device.

  • esxcli system boot device get15 8.Last command i want to highlight is vicfg-ntp commands in the vSphere Management Assistant which you can use to query and configure Network Time Protocol (NTP) settings.
  • (i) List the NTP servers that are configured onesxi01.vclass.local.
  • vicfg-ntp –list
  • NTP servers are not yet configured.16
  • (ii)  top the NTP service.
  • vicfg-ntp –stop
  • (iii) Add an NTP server.
  • vicfg-ntp –add 172.20.10.5

    17

  • (iv) List the configured NTP server.
  • vicfg-ntp –list18.png
  • (v) Start the NTP service.
  • vicfg-ntp –start


Configuring vCenter Server 6 Appliance to use Active Directory Services

In this blog i will show how to configure Active directory in vCenter server appliance in vSphere 6 . i will also show how to grant the ESX Admins group in active directory right to log in to VMware vCenter Serve as administrators.

First we need to add the acitve directory to VCSA as follow:

– login to web client using administrator account.
– Point to the Home icon and select Home.
– In the left pane, click Administration and click System Configuration.1

– in the left pane, click Nodes and select vc01.vclass.local.(vCenter server)

2
– On the System Configuration page, click the Manage tab.
– In the middle pane, click Active Directory and click Join.3

– In the Domain text box, enter vclass.local.(enter your domain here)
– leave the Organizational unit text box empty.
– In the user name and password text boxes
– Click OK.4
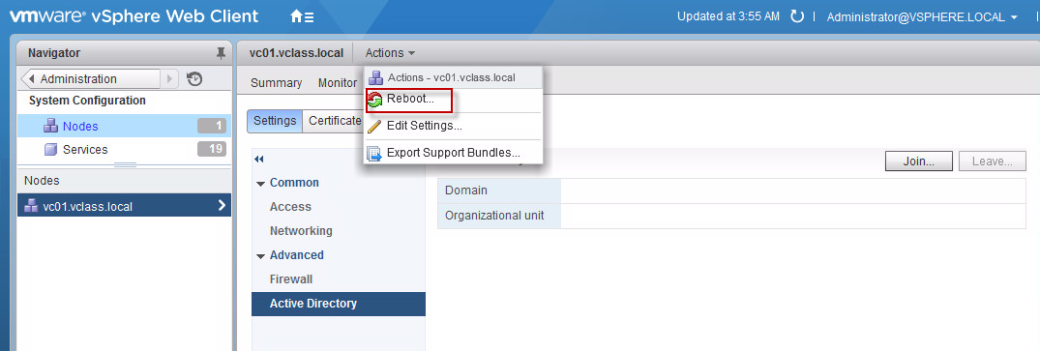
– At the top of the middle pane, click Actions and select Reboot.
– In the Reboot window, enter a reason for the reboot and click OK.5.png

– vCenter Server Appliance takes several minutes to reboot. You can refresh the vSphere     Web Client page, or close the browser window and reopen it, to show when the appliance is back up.
– After the reboot you should see the domain as below:

6.png

Now i will add active directory as an identity resource in web client and grant the ESX Admins group in active directory the right to log in to VMware vCenter Server™ as administrators.

– Point to the Home icon and select Home.
– In the left pane, click Administration.
– Under Single Sign-On, select Configuration.
– Click the Identity Sources tab.
– Click the Add Identity Source (green plus sign) icon.7.png

– In the Add identity source dialog box, select Active Directory as a LDAP Server for the Identify source type.
– In the Name text box, entervclass.local.
– In the Base DN for users text box, enter CN=Users, DC=vclass, DC=local.
– In the Domain name text box, entervclass.local.
– In the Domain alias text box, entervclass.
– In the Base DN for groups text box, enter CN=Users, DC=vclass, DC=local.
– In the Primary server URL text box, enter ldap://vclass.local:389.
– In the Username text box, enter username in domain\Administrator format.
– In the Password text box, enter password
– Click Test Connection. 8.png

– A dialog box appears indicating that the connection has been established.
– Click OK.
– Click OK to close the Add identity source dialog box.9.png
– In the left pane under Single-Sign-On, select Users and Groups.
– Click the Groups tab.
– Under Group Name, click Administrators.10.png
– In the bottom Group Members pane, click the Add member (blue person with green plus sign) icon.
– Select the domain you just added.
– Select the Domain Admins group and click Add.

11.png

-click OK.

i hope this blog was helpful. keep learning and keep sharing 🙂