CKA (Kubernetes Certified Administrator) Exam Experience

On July 24th, 2020, I sat and passed the Certified Kubernetes Administrator exam in the first attempt. Picture1.png

Motivation:

I started looking into Kubernetes platform seriously from  last year in October when I attended a two days Kubernetes Bootcamp in Paris, the training gave me a basic understanding but there were a lot of missing pieces which lead me to set up a small Kubernetes cluster on my laptop to get more hands-on and exposure on the platform. The good thing about Kubernetes home lab setup is you don’t need fancy home lab gears. I was able to set up a 5 nodes Kubernetes cluster with Ubuntu nodes using VMware Workstation on my laptop with 4 x 2.8 GHz CPU and 32 GB of RAM without much trouble.

Another reason for learning Kubernetes was to align with VMware’s strategy towards Kubernetes. With the recent VMware acquisitions (Heptio, Bitnami, Pivotal, and Octarine) and the way we rearchitected the vSphere (Project Pacific) to deeply embed and integrate Kubernetes, we believe Kubernetes will prove to be the cloud normalization layer of the future.

Preparation:

I started with Kubernetes Fundamentals (LFS 258) course from Linux Academy.

https://training.linuxfoundation.org/training/kubernetes-fundamentals/

went through the course once at a high level and enrolled with “Mumshad Mannambeth” Certified Kubernetes Administrator course on “Kodekloud.com”

https://kodekloud.com/p/certified-kubernetes-administrator-with-practice-tests

Mumshad course is like a breeze of fresh air, very well explained and articulated with practice labs, I followed Mumshad CKA course thoroughly a couple of times along with Kubernetes.io documentation for my preparation. For anyone looking to prepare CKA, I would highly recommend this course.

Exam Curriculum:

The CKA Certification exam includes these general domains, concepts you will be tested against, and their weights on the exam:

Application Lifecycle Management – 8%

  • Understand deployments and how to perform rolling update and rollbacks
  • Know various ways to configure applications
  • Know how to scale applications
  • Understand the primitives necessary to create a self-healing application

Installation, Configuration & Validation – 12%

  • Design a Kubernetes Cluster
  • Install Kubernetes Masters and Nodes
  • Configure secure cluster communication
  • Configure a highly-available Kubernetes cluster
  • Know where to get the Kubernetes release binaries
  • Provision underlying infrastructure to deploy a Kubernetes cluster
  • Choose a network solution
  • Choose your Kubernetes infrastructure configuration
  • Run end-to-end tests on your cluster
  • Analyze end-to-end test results
  • Run Node end-to-end Tests
  • Install and use kubeadm to install, configure, and manage Kubernetes clusters

Core Concepts – 19%

  • Understand the Kubernetes API primitive
  • Understand the Kubernetes cluster architecture
  • Understand Services and other network primitives

Networking – 11%

  • Understand the networking configuration on the cluster nodes
  • Understand Pod networking concepts
  • Understand Service Networking
  • Deploy and configure network load balancer
  • Know how to use Ingress rules
  • Know how to configure and use the cluster DNS
  • Understand CNI

Scheduling – 5%

  • Use label selectors to schedule Pods
  • Understand the role of DaemonSets
  • Understand how resource limits can affect Pod scheduling
  • Understand how to run multiple schedulers and how to configure Pods to use them
  • Manually schedule a pod without a scheduler
  • Display scheduler events

Security – 12%

  • Know how to configure authentication and authorization
  • Understand Kubernetes security primitives
  • Know how to configure network policies
  • Create and manage TLS certificates for cluster components
  • Work with images securely
  • Define security contexts
  • Secure persistent key-value store

Cluster Maintenance – 11%

  • Understand Kubernetes cluster upgrade process
  • Facilitate operating system upgrades
  • Implement backup and restore methodologies

Logging / Monitoring – 5%

  • Understand how to monitor all cluster components
  • Understand how to monitor applications
  • Manage cluster component logs
  • Manage application logs

Storage – 7%

  • Understand persistent volumes and know how to create them
  • Understand access modes for volumes
  • Understand persistent volume claims primitive
  • Understand Kubernetes storage objects
  • Know how to configure applications with persistent storage

Troubleshooting – 10%

  • Troubleshoot application failure
  • Troubleshoot control plane failure
  • Troubleshoot worker node failure
  • Troubleshoot networking

Exam Experience

  • I had a bit of fun with the exam, the first time I scheduled in the second week of July 2020, the proctor was not able to start the screen share due to some technical reason. Later I found out it was the firewall issue; I was using my employer laptop and due to group policies configuration, I was not able to disable the firewall. It’s a handy little tip, try to use a personal laptop if possible or make sure there are no firewall rules blocking remote connections.
  • While “Kubernetes the hard way is an awesome resource” from “Kelsey Hightower” to get a good understanding on Kubernetes bootstrapping process and understand how various Kubernetes control plane components configured and interact with each other which, Make sure to practice and make yourself comfortable with Kubernetes control plane installation and upgrades using KUBEADM from exam perspective.
  • I got 24 questions in total to solve in 180 minutes, which is 7.5 minutes per question. Note that Not all questions carry the same marks, it would be a good strategy to knock down questions that are tricky, lengthy, and carry more marks first before taking on simple ones.  I took a rather simple approach to go with the questions as they come, however, I did feel that it would have been better to solve complex questions with multiple tasks in starting when the energy and concentration levels are relatively high.
  • I have read a couple of threads and blogs online where someone was mentioning that some topics can be left as they don’t come in the exam. Make sure to cover all the topics mentioned in the exam curriculum, I was tested almost on all the concepts mention in the exam blueprint.
  • Copy-paste works well within the exam console and from outside without any issues For Mac: ⌘+C to copy and ⌘+V to paste For Windows: Ctrl+Insert to copy and Shift+Insert to paste.
  • For Static pod questions, to use the Notepad (on the top menu under ‘Exam Controls’) to write the YAML file and then SSH into the respective node and paste the manifest file in the right directory.
  • The first thing you should do before attempting the first question is to setup autocomplete permanently to your bash shell. This will save a lot of time while typing commands:

source <(kubectl completion bash)

echo “source <(kubectl completion bash)” >> ~/.bashrc

  • Get yourself familiar with the systemctl to manage systemd services, it will help you with the troubleshooting question on worker node failure scenarios.
  • The passing percentage is 74%, which I believe is on a higher side for an exam which is purely hands-on with no multiple-choice questions.  It’s very critical to attempt all questions since a lot of questions have multiple tasks, you will get partial marks for the completed tasks. Leaving a question unattempted would be like shooting yourself in the foot.
  • Although you are allowed to search/copy-paste from Kubernetes.io portal during the exam, you don’t want to waste time scrolling Kubernetes documentation trying to find information. Make yourself familiar with the Kubernetes .io portal, it will help to navigate and find the right information/command/yaml template without wasting time.
  • Make yourself comfortable with the kubectl commands, so that you don’t need to search Kubernetes documentation for every question. Use “—dry-run” with “-o yaml” command parameter with kubectl to create YAML definitions that can redirect to a file, which you can modify later to create the required resource.
  • In terms of difficulty level, I would rate CKA equal or slightly tougher then VMware VCAP deploy exam because of the fact that you are under constant time pressure.
  • The exam is based on Kubernetes v1.18 consisting of 6 Kubernetes clusters. context to use for a particular question will be provided in the exam console.

Picture2.png

  • CKA exam with Kubernetes 1.19 will be available to schedule form 1st September 2020. I don’t expect a lot of changes in the exam pattern and number of questions but you never know. I case you are confident and prepared, I would recommend giving it a shot now.

Important commands

Below are some commands which will be handy during the exam. I am not covering all the commands in detail below is just an example.

POD

Create an alpine Pod

$ kubectl run –generator=run-pod/v1 alpine –image=alpine

Generate the POD Manifest YAML file to run an Nginx pod (-o yaml) with –dry-run option to generate a manifest file.

$ kubectl run –generator=run-pod/v1 nginx –image=nginx –dry-run -o yaml

Deployment

Create a deployment

$ kubectl create deployment –image=nginx nginx

Generate Deployment YAML file

$ kubectl create deployment –image=nginx nginx –dry-run -o yaml

Generate Deployment YAML file (-o yaml) with 3 Replicas (–replicas=3)

$ kubectl create deployment nginx –image=nginx

$ kubectl scale deployment nginx –-replicas=3

note:

kubectl create deployment does not have a –replicas option. Create the deployment and then scale it using the kubectl scale command.

Service

Create a Service named httpd-service of type ClusterIP to expose pod httpd on port 80

$ kubectl expose pod httpd –port=80 –name httpd-service –dry-run -o yaml

This will use pod’s labels as selectors

Other option:

$ kubectl create service clusterip httpd –tcp=80:80 –dry-run -o yaml

This command will assume selectors as app=httpd. You cannot pass in selectors as an option.  it does not work if the pod has a different label set. Therefore, generate the file and modify the selectors before creating the service.

Create a Service named nginx of type NodePort to expose pod nginx’s port 80 on port 30082 on the nodes:

$ kubectl expose pod nginx –port=80 –name nginx-service –dry-run -o yaml

Above commands automatically use the pod’s labels as selectors, however, you cannot specify the node port. Generate the definition file using –dry-run & -o yaml and add the node port manually before creating the service with the pod.

Or

$ kubectl create service nodeport nginx –tcp=80:80 –node-port=30086 –dry-run -o yaml

This command will not use the pods’ labels as selectors.

As I mentioned I have not covered other important topics from exam perspective ie: PV, PVC, Networking, Network Policies, Ingress, RBAC, Roles & Role Bindings, Secrets, Config Maps, Commands & Arguments, rolling updates, installation and upgrades using KUBEADM, application, control plane, and node failure troubleshooting scenarios, Static Pods, node affinity, taint and tolerations, manual scheduling, etc.

In case you are planning to go for CKA, all the best and go for it. i hope you find the blog helpful.

Part 2: Expending vSAN 6.6 Datastore after initial VCSA bootstrap

This post is in continuation with my previous post “Bootstrap vCenter Server Appliance 6.5 on vSAN 6.6” ,refer to the below link:

Bootstrap vCenter Server Appliance 6.5 on vSAN 6.6

I will cover the expansion of the vSAN datastore created during the VCSA bootstrap in the previous blog post.

The first thing after vCenter deployment is to add the hosts in vCenter and configure the VMkernel interface for vSAN traffic (and any other VMkernel interface) on each host. I have personally configured the VMK interface on the standard switches and later migrated them to the VDS (I am not covering the standard to distributed switch migration in this post).

This is how VMkernel networking looks on hosts:

1.png2.png3.png4.png

Now turn on the vSAN by clicking on edit option under Cluster -> VSAN –> General -> Edit

1.png

Cluster –> configure -> under vSAN click on Disk management ->claim disks

1

In manual mode vSAN will show you all the eligible HDD and SSD which can be claimed from the Hosts in the cluster with vSAN VMK configured

1.png

Above is the list of all the HDD from the 3 hosts, to claim the HDD simply click on “claim for capacity tier”.

1.png

Similarly we can claim all the flash resources from the eligible host by clicking on “claim for cache tier” .

1.png

Once you claim the SSD and HDD resources, vSAN will start the creation of the disk groups, you can see this in the vCenter recent tasks:

1.png

Go to the vSAN Datastore summary to confirm if the total capacity is reflecting the storage from all vSAN host in the cluster.

1.png

That’s all for this. Let me know if you have any feedback’s and do share this is you consider the posts worth sharing.

Part 1: Bootstrap vCenter Server Appliance 6.5 on vSAN 6.6:

I have recently installed vSphere 6.5 and vSAN 6.6 in our lab, I have got 4 vSAN Hybrid ready nodes ,  which I will use to setup a vSAN cluster.

Most interesting thing with the 6.5 vSphere release apart from the HTML client and other enhancements  is the ability to bootstrap VCSA on a target host by creating a vSAN datastore. With earlier version we used to deploy the VCSA on a temporary data store and later storage vMotioed to the vSAN datastore.

“Jase McCarty” has written a cool blog on the same, you can refer to the below link for details:

Bootstrap the VCSA onto vSAN 6.6

However, I will try to cover the deployment in more details including all the screenshot which can help people deploying vSAN 6.6 for the first time. So let’s get started.

I have installed ESXi 6. 5 on all 4 nodes. It’s time to install the vCenter to configure the vSAN Cluster.

Mount the VCSA installer and run the installer.exe file:1

Wizard is similar to previous VCSA 6.x install until we reach the “Install – Stage 1: Deploy PSC” page:11.png

1

I am deploying the External PSC appliance, however the process is similar for Embedded PSC as well.1

The Screenshot is self-explanatory, I am deploying the vCenter appliance on ESXi host “172.24.1.101” .

1

Select yes for the certificate warning.

1.png

1

This is where we will be creating a vSAN datastore locally on the host and install VCSA. Note that during bootstrapping, you don’t need to have vSAN Network configured on all the nodes. At this moment vSAN Datastore is local to the host, I will cover in another blog post how to expand the vSAN Datastore by claiming the disk from other nodes in the cluster.

1


1.png

Provided you are using a vSAN compatible controller and Drives, ESXi will detect the flash and HDD resources in the server. In case ESXi is not detecting Flash or HDD, you can manually tag local storage resources as SSD or HDD in this step. For checking the vSAN compatibility, refer to the link below:

VMware Compatibility Guide


1.png

Enter the required networking details for the PSC, make sure to configure the DNS host name resolution (forward and reverse) of PSC before deployment .

1.png

Finish and wait, the deployment took less than 5 minutes

1

1.png

1.png

Looking at the host client, I can now see a new “vSAN datastore” and PSC getting deployed on newly created vSAN Datastore.

1

Once done, we need to configure the appliance size and SSO in stage 2, refer to the below screenshots:

1

1

1.png

Here you can either join the PSC to an existing SSO (if exists) to run a linked mode configuration or if it is a new deployment select the “create new SSO domain”.

1.png

1.png

That’s it for PSC deployment, now we need to run the same installer, this time we will install the vCenter server.

1.png

1.png

1

1

1.png

Select the vSAN datastore created during the PSC installation.

1.png

Enter the network configuration for the vCenter server:

1.png

1.png

1.png

Finish and wait, you can actually see the VCSA deployment progress by login in to the target host.

1.png

1.png

1.png

1.png

1.png

With this now we need to configure the SSO for the vCenter server to complete the deployment.

1

1.png

That’s it for this post , I have covered the expansion of vSAN datastore by claiming storage resources from rest of the hosts in below post :

Expending vSAN 6.6 Datastore after initial VCSA bootstrap

Migrating from vCenter Server Embedded PSC to External PSC in vCenter Server 6

For the past few weeks i am working on enhancing my VMware home lab setup to be more scalable and enterprise grade , which gave me an opportunity to migrate the embededd PSC to external to extend my vCenter Single Sign-On domain with more vCenter Server instances to support multi site NSX and SRM use cases, you can reconfigure and repoint the existing vCenter Server instance to an external Platform Services Controller.

Few things to note before starting the migration :

  • The process is relatively straightforwad but remember there is no coming back once you migrate the embedded PSC to external .
  • Make Sure to take the snapshot of vCenter Server , in case anything gone wrong during the migration you can revert back vCenter to the last working state
  • Non Ephemeral virtual port groups are not supported by the PSC , as a workaround we need to create a new Ephemeral port group in the same VLAN (if using VLANs) as vCenter server network for the sake of deployment of new PSC . You can migrate the PSC network to non ephemeral port group after the migration completes successfully .


This is what I am running in my lab currently , a vCenter server appliance with embedded PSC:

1

I want to achieve the below topology with External PSC:

1

Lets start this by installing the external Platform Services Controller instance as a replication partner of the existing embedded Platform Services Controller instance in the same vCenter Single Sign-On site.

Mount the VCSA ISO and start the installation .

1.png

Enter the credentials of the ESXi host where you are planning to deploy the PSC appliance.

1

Acceppt the self sigh certificate .

1

1

Here select “Install Platform Service Controller” .1.png

Select Join an SSO domain in an existing vCenetr PSC:

1

Join the exsiting site and select the SSO site name:

1

1

1.png

As I have explained before e, if you have not created a Ephemeral virtual port group you will  not be able to select a network to deploy the new PSC.

1.png

Go back to vCenter and create a Distributed port group with Ephemeral port binding which will be used for the PSC Deployment.

1.png

Enter the standard networking parameters and complete the deployment wizard.

1.png

1.png

Click on finish and wait for the deployment completion . This process will take approx: 8-10 minutes.

1

You will get the below screen once PSC deployed successfully.

1

Now , Log in to the vCenter Server instance with an embedded Platform Services Controller.Verify that all Platform Services Controller services are running by executing the below command:

service-control –status –all

1

The final step is to run the below command to repoint the embedded PSC to new deployed external PSC:

cmsso-util reconfigure –repoint-psc psc_fqdn_or_static_ip –username username –domain-name domain_name –passwd password [–dc-port port_number]

Use the  –dc-port  option if the external Platform Services Controller runs on a custom HTTPS port. The default value of the HTTPS port is 443.

1.png

If you have followed all the instructions mentioned above, you will get the below success message: “vCenter Server has been successfully reconfigured and repointed to the external PSC 172.18.36.17 .

1

That was it , PSC has been successfully migrated from Embedded to external! I hope it was helpful .

VMware vRealize Network Insight 3.4 Installation & Initial setup

vRealize Network Insight (vRNI) delivers intelligent operations for your software defined network environment (specially NSX). In short, it does what vRealize Operations does for your virtualized environment, but only to the SDN environment. With the help of this product you can optimize network performance and availability with visibility and analytics across virtual and physical networks. Provide planning and recommendations for implementing micro-segmentation security, plus operational views to quickly and confidently manage and scale VMware NSX deployment.

This product comes with the following two OVA files.

VMware_vRealize_Network_Insight_3.4_platform.ova

VMware_vRealize_Network_Insight_3.4_proxy.ova

Below are the system requirement for the OVA deployment.

System Requirements:

  • vRealize Network Insight Platform OVA:

– 8 cores – Reservation 4096 Mhz

– 32 GB RAM – Reservation – 16GB

– 750 GB – HDD, Thin provisioned

  • vRealize Network Insight Proxy OVA
  • 4 cores – Reservation 2048 Mhz
  • 10 GB RAM – Reservation – 5GB
  • 150 GB – HDD, Thin provisioned
  • VMware vCenter Server (version 5.5 and 6.0).
  • vCenter Server Credentials with privileges:
  • Distributed Switch: Modify
  • dvPort group: Modify
  • VMware ESXi:
  • 5.5 Update 2 (Build 2068190) and above
  • 6.0 Update 1b (Build 3380124) and above
  • VMware Tools is installed on all the virtual machines in the data center. This helps in identifying the VM to VM traffic.

The deployment is relatively straight forward, similar to deploying any other OVA.

11

Select the Data center

1.png
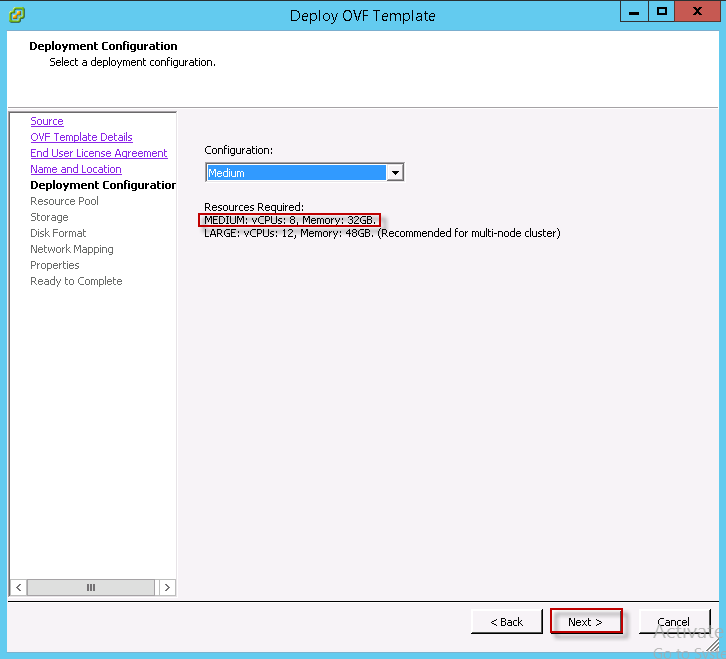
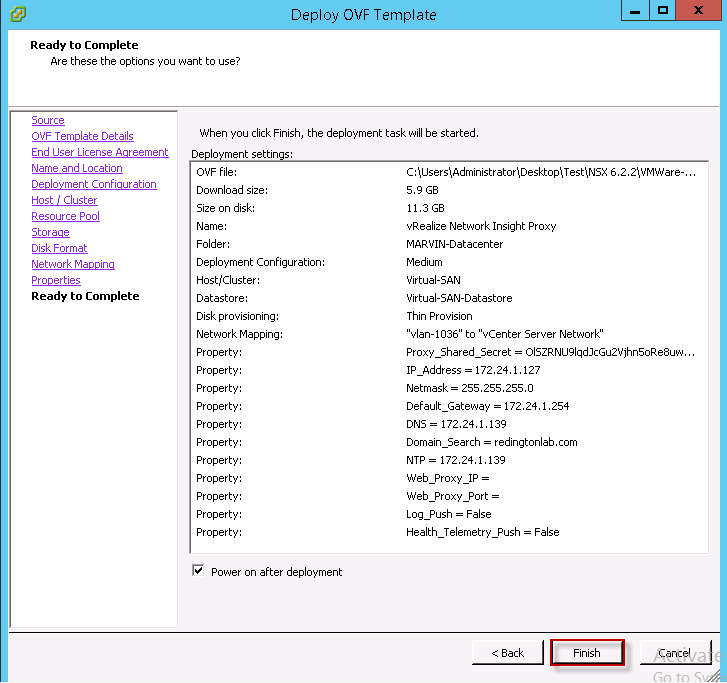
For my environment, I am going with the medium configuration.1.png

1.png

Select the datastore to be used by the virtual appliance.

1.png

I am going with the thin provisioning option, however I would strongly recommend to use for thick provision in production environment.1


1.png

Below, simply enter the basic networking details.

1.png

Once done, click on finish and wait for the virtual appliance deployment completion.1.png

You can open the virtual appliance console to check the progress of appliance deployment.

1.png

Once Appliance is successfully deployed and powered on, go to the configuration screen by going to https://<IP or FQDN of the appliance> . The first thing is to enter the vRNI license and click on validate.

1

Once the license is validated, setup the admin password for the appliance login.  Click on activate

1.png

Next, you need to generate the secret for the proxy VM. Click on Generate button to generate the Secret.

1.png

Copy the shared secret. Platform Appliance will wait for the deployment of Proxy VM. It will keep looking for it till the time proxy VM is deployed.

Let’s go ahead and deploy the Proxy VM .I will not cover the Proxy VM deployment again, it’s relatively straight forward and similar to the platform appliance deployment.

During Proxy Appliance deployment under property, you need to paste the shared secret generated during the platform virtual appliance

1.png1

Once the deployment is done and the Proxy VM is up and running, it is automatically sensed in the main configuration page.1.png

Click on finish and login to the vRNI GUI using “admin@local” user and password that you have setup initially.1.png1.png

First thing after logging in to the appliance for the first time is adding the data sources (vCenter Server and NSX manager).

On the top right corner, click on Profile -> settings ->Data Sources ->Add new data sources.1.png

1.png

Enter the vCenter server admin credentials and validate to check if vRNI is able to connect to vCenter Server successfully 1.png

1.png

1.png

1.png

Similarly add NSX manager as a data source to vRNI and validate.1.png

1.png

1.png

1.png

This conclude the vRNI appliance deployment and initial configuration.